
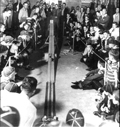
First Pinwood Derby
Cub Scouts, families and friends watch the first Pinewood Derby, which was held at the Scout House in Manhattan Beach in 1953. Scout-master Don Murphy invented the race.
"Pinewood Derby Speed Secrets"
available at the Scout Shop
Pinewood Derby Patches
Contact Us
Email: contact@
slgpack371.com
- Pinewood Derby
- Winning Tips
- Our Pack Races
Origins of Pinwood Derby
Cubmaster Don Murphy organized the first pinewood derby, held on May 15, 1953 in Manhattan Beach, California by Pack 280. Murphy's son was too young to participate in the popular Soap Box Derby races, so he came up with the idea of racing miniature wood cars. The cars had the same gravity-powered concept as the full-size Soap Box Derby cars, but were much smaller and easier to build. After Don Murphy's first race in 1953 the Los Angeles County Department of Recreation copied the pinewood derby with Murphy's permission.
In the 1980s, the design of the block was changed from a cutout block, consistent with a 1940's style front-engined Indy 500 car, to a solid block. The tires were also changed from narrow, hard plastic, to wider "slicks".
Construction
The Scout is given a block of wood made of pine with two notches for wheels, four plastic wheels and four nails. The finished car must use all nine pieces, must not exceed a certain weight (usually five ounces), must not exceed a certain length and must fit on the track used by that particular scout pack.
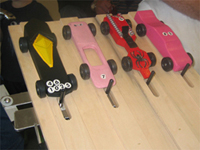
Blocks can be whittled with a hand knife or a band saw or Dremel carving tool for major shaping. Decals can be bought at scout shops or hobby shops. It is also possible to use standard model decals to replicate actual racing cars such as Richard Petty's 1970 Plymouth Superbird, shown at right. The original style is based on open wheel cars, however, fender or body kits are available, or wheels can simply be placed outboard of the body.
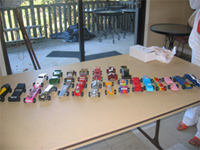
Other than the previous basic design rules, the Cub Scout is able to carve and decorate the car as he chooses. Many Cub Scouts also add weights to the final design to bring the car to the maximum allowable weight; coins, glue-in lead pieces, and melted lead are common ways to add weight. Cars typically vary from unfinished blocks to whimsical objects, to accurate replicas of actual cars. The fastest cars tend to resemble low doorstops, with weight at the rear. Graphite is usually the only lubricant allowed, and it often helps to polish the provided nails.
The idea behind the pinewood derby is for the parent, usually the father, but occasionally the mother or grandparent, to spend time helping the child design, carve, paint, add weights, and tune the final car. However, it is often the case that the parent takes over the construction of the car, an aspect of the event that was lampooned in the 2005 film Down and Derby, and also in a 2009 episode of "South Park". The quest for a fast car supports a cottage industry that supplies modified wheels, axles, and blocks as well as videos and instruction books. While a pinewood derby car kit costs around $4, a set of modified wheels and axles can sell for more than ten times that amount. These aftermarket items are legal under some Pack rules since the parts originally came from an official BSA kit.
Competition
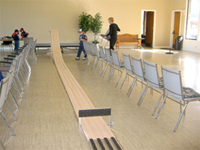
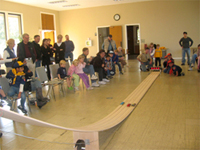
The track usually has two to six lanes and slopes down to the ground, since the cars are powered by gravity. Tracks may be owned by the pack or rented. The race is run in heats, giving every car the chance to run on each lane. The racers can be grouped with others from the same rank (Tiger Cubs, Wolf Cubs, Bear Cubs, etc.), or can compete against the pack as a whole.
The first, second, and third place winners usually receive ribbons, medals or trophies. Some packs also award on the basis of car design. The first place race winners get to advance to the district level, then each of the district-wide race winners get to race each other from across the entire council.
Car Modifications
The force propelling a pinewood derby car is gravity and the only opposing force is friction, therefore car modifications are aimed at minimizing the friction that occurs when the wheel spins on the axle, contacts the axle head or car body, or contacts the track guide rail. Friction due to wind resistance is a minor, although not insignificant, factor. The wheel tread can be sanded or lathed and the inner surface of the hub can be coned to minimize the contact area between the hub and body. Polishing the wheel, especially the inner hub, with a plastic polish can also reduce friction. Often one front wheel is raised slightly so that it does not contact the track and add to the rolling resistance. Axles are filed or lathed to remove the burr and crimp marks and polished smooth. More extensive modifications involve tapering the axle head and cutting a notch to minimize the wheel-to-axle contact area. Note that packs can establish additional rules for what, if any, modifications are allowed. In some areas, no changes can be made to the axles or wheels.
A second consideration is the rotational energy stored in the wheels. The pinewood derby car converts gravitational potential energy into translational kinetic energy (speed) plus rotational energy. Heavier wheels have a greater moment of inertia and their spinning takes away energy that would otherwise contribute to the speed of the car. A standard wheel has a mass of 3.6 g, but this can be reduced to as little as 1 g by removing material from the inside of the wheel. A raised wheel can reduce the rotational energy up to one-quarter, but this advantage is less with a bumpy track.
A proper lubricant, typically graphite powder, is essential. Wheel alignment is important both to minimize wheel contact with the axle head and body as well as to limit the contact between the wheels and guide rail as the car travels down the track. The center of mass of a typical car is low and slightly ahead of the rear axle, which helps the car track straight as well as providing a slight advantage due to the additional gravitational potential energy.
Pinewood Derby Building Tips
Prepare the Axle Supports (holes) in the BlockThe axle slots or holes must be square with the block. Using a drill or drill press, drill new axle holes using a #43 or #44 bit (#44 is the axle size for the new 1998 kits). We use the #43 so that the axles easily fit into the axle holes (Later you will see how we secure the axles into the holes -- all this makes it possible and easy for the scout to install and secure the axles/wheels). If legal under your local rules, lengthen the wheelbase -- the longer wheelbases seem to be more stable. I also drill the right front axle hole higher to lift the right front wheel off the track (3 wheels, rather than 4, means a slight reduction in friction, but more importantly, it provides a place to put your worst wheel. It seems there is always at least one really bad wheel in the kit).
What you want is wheels that run true on the axle
and "absolutely" do not rub the car body when running.
Build glue application channels for gluing in axles. This is simply drilling a 3/32 hole or cutting a slot from the bottom of the car into the axle channel. This makes it real easy for the scout to secure the axles in with a drop or two of glue after all construction and testing have been completed.
Build graphite application channels for lubricating the axles and wheels. This is simply grinding or cutting away a small area of wood on the bottom of the block below the axle. It makes it much easier for the scout to apply graphite to the axles and wheels after all construction is completed.
Create weight storage compartment
Pick your weights ahead of time and make a hole(s) or pit for the weight at this point. You will probably be adding from 1.5 - 2.3 ounces of weight. You can put weights in anywhere, but the experts say the weight placement should be biased toward the back of the car making the balance point 1" to 1 1/4" in front of the read axle. I totally agree with this weight placement. The images below provide what I consider to be the best idea for weight placement. The holes for the weights (3/8") are drilled to accept standard tubular weights available from your local Boy Scout supply store. This way the scout can safely participate in adding weigh to his car. A few drops of glue will hold the weights in and you can putty over the holes before painting.

![]()
Build the car body
This is where any age kid can get really involved and have lots of fun. Keep the car shape as simple as possible so the kids can actually help do the work. Apply the design to the block, carve (not for kids), saw, sand and paint, etc. The kids can really have fun here and, for the most part, will not negatively affect the performance of the car. Just a couple of tips here: (1) Make sure to take off a good bit off wood, because you will want to control the amount and location for added weight. (2) My fastest cars are the ones with the skinniest and slickest profile.
Minimize rolling friction
True and polish the wheels and axles.
(Remember, one wheel is going to be off the track, so pick the best 3 wheels and axles to start with. You can roll the wheels on a glass table & spin the wheels and axles in a drill to find the best ones) You can really have some fun with the scouts when testing the wheels on a table. It's like a race in itself. Do not alter the basic shape of the Boy Scout kit wheels -- you only want to remove any imperfections and smooth up the finish.
True and polish the wheels using a drill and vice setup. You clamp the drill in the vice and spin the wheels using a wheel auger (available from your Boy Scout supply store). True the wheels to round using a small flat file then polish with a 1500 grit wet-sand paper. Make sure you keep the paper wet -- this cools the work and also provides an exceptionally smooth end result.
The axles require special treatment. A drill/dremel drill press setup is required for all steps. Using a very fine ignition file, remove the flashing from the inside head of the axle and shaft (this is where you will want to create the angle on the inside of the axle head). Polish with the 1500 grit wet-sand paper and finish off with chrome polish and a soft cotton cloth.
Finish construction
- Weigh all car parts and get the car to the right weight and finish off any needed sanding, painting, patching, detailing, etc. The scout can do most all of this with very little assistance. You do not want to have to do any of this type of work after the car is assembled.
- Rub graphite on the car body where the wheel hub runs against it. Rub it in really well. Enough will stick to provide a really slick surface for the wheel to rub against if the wheel happens to hit the car body during the race. The scout can do this with minimal assistance.
- Insert the wheels and axles into the axle holes (do NOT glue yet). We use a tongue depressor (1/16" - 3/32" thick) to set the wheel clearances. The scout can do this easily, since you prepared the special axle holes!
Wheel clearances are critical! You want plenty
of slack for the wheel to move freely.
- Test the assembled car (no glue yet) on an inclined table -- glass is preferred. Test your new car against the baseline (last year's fast car). The table test will not tell you which car will be fastest on the track, but it will help you "tune" your car to be as fast as possible. The scout will really enjoy this part (as long as you don't over do it). If you have access to a track, do final testing on the track before the race.
- If you have to take the wheels off for any reason. Mark the "top" of each axle and put the wheels and axles into baggies labeled LF, RF, LR, RR. This makes sure you get the wheels and axles back onto the car in the right position. You will want to have some graphite in the bags also.
- Apply glue in the glue application channels to secure the axles. If the scout is careful, he can do this with minimal assistance.
- Continuously force graphite into wheel and axle areas and spin them till they are worn in really well. Also rub graphite onto the wheel itself. You can't put too much graphite on -- any excess will just fall out and blow away. And, you can't spin the wheels too much -- the kids are great at spinning the wheels.
Tuning -- Axle and wheel alignment
A really fast derby car must have true running axles and wheels. Sometimes this happens by accident, but it is best to make sure the axles and wheels are running true by tuning the car. The scout can have some fun here but not if it's over done. Dad can do some tuning and the scout can do the kitchen table races. Some of the links below go into great detail on axle alignment, but we found these to be too detailed for either me or my son to follow. The use of wax paper shims might be o.k., but only to correct a really bad axle problem -- aligning all axles and wheels using this method is difficult and boring. I doubt you would ever find a scout that would consider this a fun exercise.
Note: There are several sources for specially tuned axles and wheels -- most of these special components would be in violation of local race rules, so don't even consider it. If you and your scout can't do the work yourself, what would be the point?
The idea is to have a car that is in near perfect alignment. Meaning that the car runs basically straight and that the wheels do not consistently ride against car body or axle head (especially against the car body!)
Some of the things you can do to tune or improve the alignment are:
- Go back to square one and make sure to start with good axle supports.
- Make sure the better of your wheels and axles are being used.
- In some cases switching your axles and wheels around may help.
- If you have a wheel that insists on rubbing against the car body while rolling, use the wax paper shims to shim the axles "up" | "back" | "up and back". (See axle alignment links below).
- If you have a really bad wheel, re-polish it and try again.
- Continue to roll assembled car and adjust the wheels and axles until you have a car that runs true. Continue to test it against your baseline car in a mini kitchen table race.
- One front wheel off the ground.
- The axle polish and angling of axle head using ignition file, 1500 grit wet-sand paper and chrome polish.
- The truing and polishing of wheels using a flat file and 1500 grit wet-sand paper.
- Sleek body profile.
- Weight near rear of car.
- Rubbing of graphite on the car body where the wheel hub hits the body.
- Testing cars on inclined table making sure the car rolls true.
- Wax paper shims to correct an out-of-line axle (if absolutely necessary).
- Rubbing the wheels down with graphite.
- Lots of graphite and spinning the night before the race.
List of Things That Appear Not to Really Help - Glue bead (covered with graphite) on body for wheel to rub against.
- Angled axles? (Again, not quite sure on this one). Actually this is one of the biggest boosts -- we were hoping you would not read this far. Drill the axle holes in the body at a downward angle of like 1 degree. This forces the wheels to "ride up" toward the axle head where it encounters much less friction that what it does when the wheel rubs the car body!
- Polishing axles with graphite pencil.
- The use of hubcaps.
__________________________________________________________________________
Source: http://www.orbl.org/pinewood-derby.html
We usually have three races
1. Tiger Den Race (1st and 2nd place winners go on to the district race)
2. Wolf/Bear/Webelos Race (1st abd 2nd place winners go on to the district)
3. Sibling race.
 |
 |
 |
 |
 |
 |